There are multiple ways to enroll children into classes in Jackrabbit Care. Each option starts with a click on the main left menu. Then select one of the following: Enrollment, Family Accounts, or Programs & Classes.
Owners, Administrators, and Site Administrators all have the permissions to enroll, move, and drop children from classes. Before you begin enrolling, be sure you have the right site selected at the top of the page.
Enrollment
- Go to the Left Menu and select one of the following:
Enrollment
On the Openings & Enrollment card:
- Click Find and Create Openings.
- Locate the class and schedule and click + Enroll.
Note: If the schedule is at or above capacity, it will show as Full or Over, but you can still click either badge to enroll more children.
On the Online Registration card:
- Click View Received Registrations.
- Click Review on the child you want to enroll.
- Click Actions menu
 > Approve and Enroll.
Family Accounts
On the Profiles card:
- Click View # Active Family Accounts and select the family.
- Click the Actions menu
 > Enroll on the Family Details page.
OR
- Click View # Active Family Accounts and select the family or use the Search field at the top of the page to locate the child.
- Select the child you wish to enroll in a class.
- Click the Actions menu> Enroll on the Child Details page.
Programs & Classes
On the Programs & Schedules card:
- Click View All Classes.
- Select a class card.
-
Click Actions menu
 > Enroll from any tab on the class page.
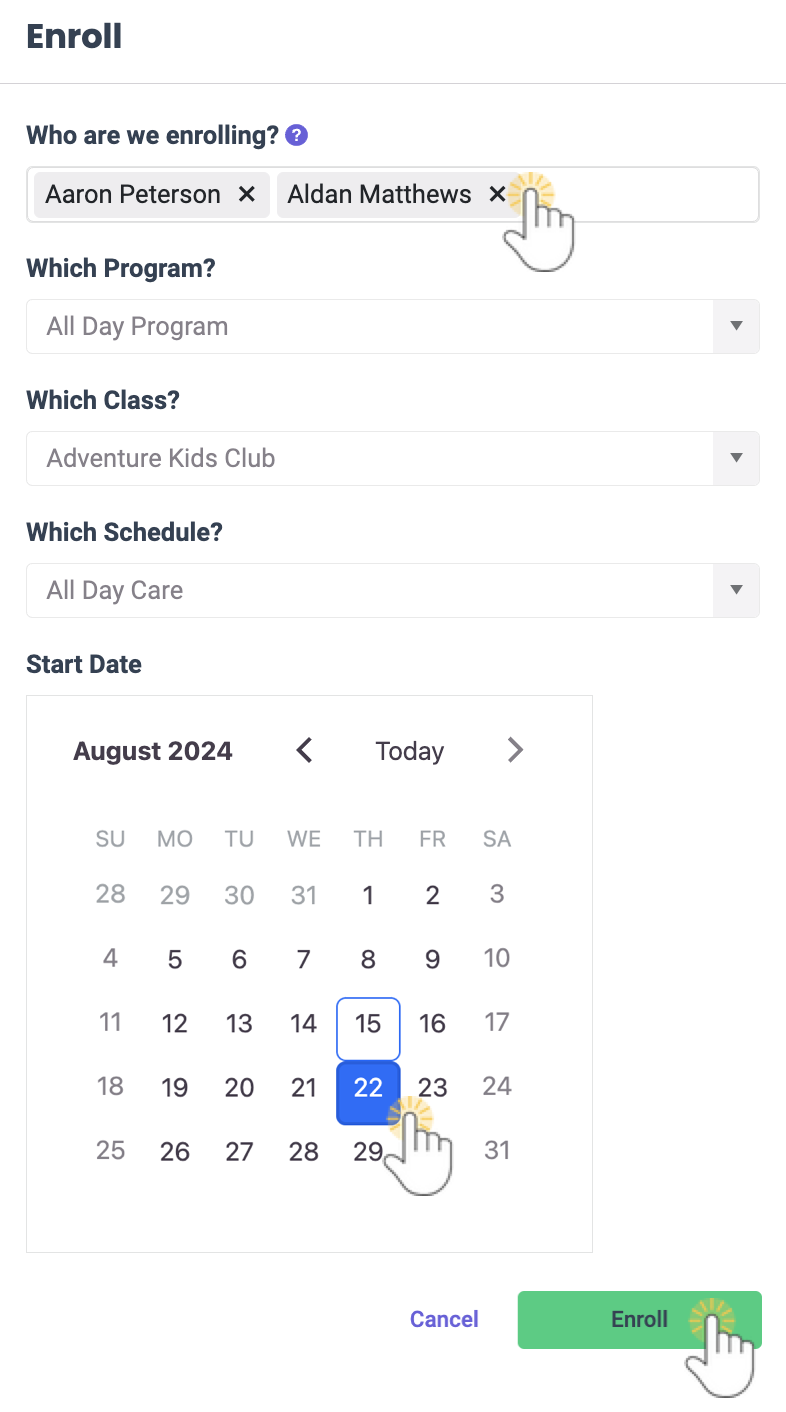
- Complete the selections in the Enroll window.
- Start typing a child's name under Who are we enrolling? and a list of names will drop down. Select the child. A warning icon
 appears if the child does not meet the age requirements for the class.
- Repeat this step to enroll multiple children at once, unless enrolling a child from an Online Registration form.
Note: Enrollment settings such as program, class, and schedule selection, dates, amounts, tuition, and discounts will apply to all children selected.
- Repeat this step to enroll multiple children at once, unless enrolling a child from an Online Registration form.
- Select the Program, Class, and Schedule if they are not already chosen based on the method used to enroll the child.
- Select the Start Date.
- Current Date - If the class is in session on the date of enrollment, the date defaults to the current date.
- Back Date - When an Administrator or Owner enrolls, they can use the calendar to select a date in the past for situations when they need to backdate an enrollment. For this scenario, time entries must be manually entered for the days the child attended in the past.
- Start typing a child's name under Who are we enrolling? and a list of names will drop down. Select the child. A warning icon
- Click Enroll.
- Decide on adding a Tuition or Registration Fee.
- Select Yes, Add a Tuition Fee, and follow the steps to Add a New Tuition Fee During Enrollment for the child.
- Click No to immediately enroll the child in the class without tuition and go directly to Add a Registration Fee.
Note: No tuition will be added to the Family Account during this enrollment. The tuition can be added at a later date. Refer to New Tuition Fees, Recurring & One-Time Fees for additional steps and details.
 > Approve and Enroll.
 > Enroll on the Family Details page.
 > Enroll from any tab on the class page.
  appears if the child does not meet the age requirements for the class.

An email is sent to the child's Legal Guardian Contact and to the teacher confirming the enrollment has been completed. The email includes the class name and start date. The Start/End Date is shown on the class with a black diamond.
Refer to Find & Create Class Openings to learn more about the Enrollment page.
