Depending on how your childcare center is organized, your classes can vary greatly to offer a variety of options to the families you serve. At Jackrabbit Care, we offer flexibility and ease when creating classes, copying classes, enrolling children in those classes, and archiving classes.
- Use the Enrollment tab to enroll a student in a class.
- Access the Class Roster from the Roster tab on the Class page.
- Archive classes when no longer in use and reinstate them when needed.
All classes can be found by going to Programs & Classes on the left menu. Owners and Administrators automatically have the permissions to create Classes; however, an Administrator is limited to creating Classes for the site(s) assigned to them when they are added as a Team Member.
Create a Class
Ensure the correct site is selected at the top of the page, then follow these steps to create a class:
- Go to Programs & Classes (left menu) > Programs & Schedules card > View All Classes.
- Click the Actions menu
 > New Class to open the Class Name window.
- Enter the name of the class and click Next.
- Select the Program the class is related to or add a new Program and click Next.
- Use the calendar to select the Start and End Date of the class, and click Next.
- Complete the Class Age Group selections for the class, and click Next.
- Enter the Max Group Size and click Save.
The new class will open in the Details tab, and a status badge indicates if the class is Active (currently in session), Inactive (the class has ended), or Scheduled (to start at a future date).
Links on the page can be used to add/edit the following details for the class:
- Class Name - Change the name of the class.
- Program - Change the Program when needed.
- Space - Select a room assignment from the drop-down list or add a New Space. Any new spaces are listed under Settings and can be found by going to Settings (left menu) > Site Setting card > Manage All # Spaces.
- Dates - Change the dates for the class as needed. A class date may be updated after a class starts and the billing information will automatically adjust for the change.
- Schedules - Select a Schedule from the drop-down list or add a New Schedule in the Class Schedules window. Tuition can be added in the Class Schedules window.
- Ages - Update as needed for the ages of the children attending the class.
- Ratio - Select the Class ratio from the drop-down list.
- Teachers - Select the teacher(s) from the drop-down list or add additional Work with Teachers & Staff.
- Max Group Size - Modify the maximum size of the class.
- Description - Enter what this class is about. This information is visible to parents and contacts when registering online.
Note: Use the Actions menu at any time to Enroll a student into the class, Copy the class, see a Name to Face Report for the class, or Archive the class.

Enroll a Child in a Class
There are multiple ways to enroll children into classes in Jackrabbit Care. Each option starts with a click on the main left menu. Then select one of the following: Enrollment, Family Accounts, or Programs & Classes.
Owners, Administrators, and Site Administrators all have the permissions to enroll, move, and drop children from classes. Before you begin enrolling, be sure you have the right site selected at the top of the page.
Enrollment
- Go to the Left Menu and select one of the following:
Enrollment
On the Openings & Enrollment card:
- Click Find and Create Openings.
- Locate the class and schedule and click + Enroll.
Note: If the schedule is at or above capacity, it will show as Full or Over, but you can still click either badge to enroll more children.
On the Online Registration card:
- Click View Received Registrations.
- Click Review on the child you want to enroll.
- Click Actions menu
 > Approve and Enroll.
Family Accounts
On the Profiles card:
- Click View # Active Family Accounts and select the family.
- Click the Actions menu> Enroll on the Family Details page.
OR
- Click View # Active Family Accounts and select the family or use the Search field at the top of the page to locate the child.
- Select the child you wish to enroll in a class.
- Click the Actions menu> Enroll on the Child Details page.
Programs & Classes
On the Programs & Schedules card:
- Click View All Classes.
- Select a class card.
-
Click Actions menu
 > Enroll from any tab on the class page.
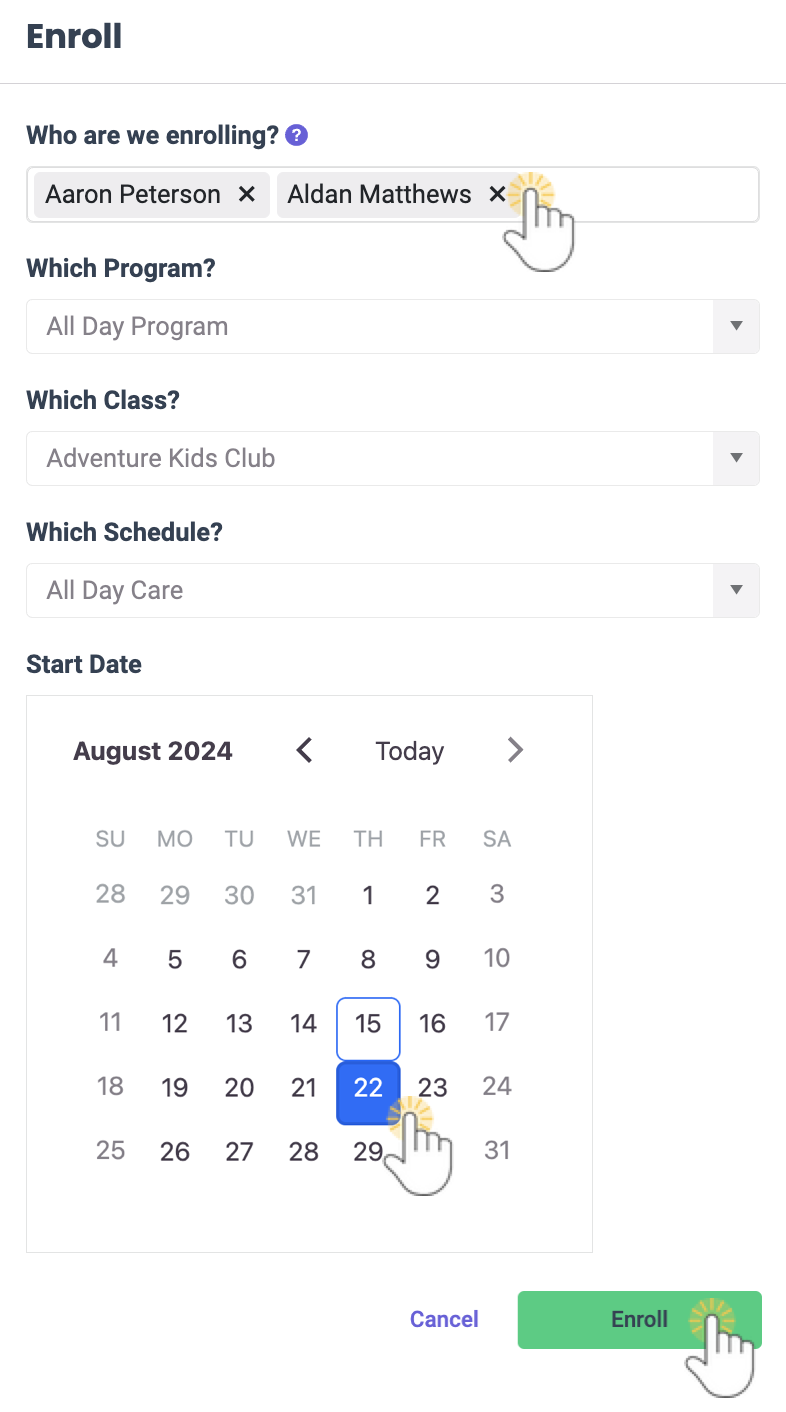
- Complete the selections in the Enroll window.
- Start typing a child's name under Who are we enrolling? and a list of names will drop down. Select the child. A warning icon
 appears if the child does not meet the age requirements for the class.
- Repeat this step to enroll multiple children at once, unless enrolling a child from an Online Registration form.
Note: Enrollment settings such as program, class, and schedule selection, dates, amounts, tuition, and discounts will apply to all children selected.
- Repeat this step to enroll multiple children at once, unless enrolling a child from an Online Registration form.
- Select the Program, Class, and Schedule if they are not already chosen based on the method used to enroll the child.
- Select the Start Date.
- Current Date - If the class is in session on the date of enrollment, the date defaults to the current date.
- Back Date - When an Administrator or Owner enrolls, they can use the calendar to select a date in the past for situations when they need to backdate an enrollment. For this scenario, time entries must be manually entered for the days the child attended in the past.
- Start typing a child's name under Who are we enrolling? and a list of names will drop down. Select the child. A warning icon
- Click Enroll.
- Decide on adding a Tuition or Registration Fee.
- Select Yes, Add a Tuition Fee, and follow the steps to Add a New Tuition Fee During Enrollment for the child.
- Click No to immediately enroll the child in the class without tuition and go directly to Add a Registration Fee.
Note: No tuition will be added to the Family Account during this enrollment. The tuition can be added at a later date. Refer to New Tuition Fees, Recurring & One-Time Fees for additional steps and details.
 > Approve and Enroll.
 > Enroll from any tab on the class page.
  appears if the child does not meet the age requirements for the class.

An email is sent to the child's Legal Guardian Contact and to the teacher confirming the enrollment has been completed. The email includes the class name and start date. The Start/End Date is shown on the class with a black diamond.
Refer to Find & Create Class Openings to learn more about the Enrollment page.
Class Enrollment Tab
Click the Enrollment tab on a class page to see the children already enrolled in a class. Additional children can be enrolled by using the Actions menu at any time. Each child's card can be expanded by using the arrow on the right. Click the Options icon to link to the following:
- Child Details - Opens the child's Details page.
- Account Details - Opens the Family Account for the enrolled child.
- Move - Opens a window to start the workflow to move a child from one class into another class.
- Drop - Opens the Drop date window to start the workflow to drop a child from the class.

The following child enrollment status badges display on the child Enrollment cards:
- Enrolled- This status is displayed with an Enrolled badge
 when a child's starting enrollment date is on or before today’s date and has no drop date scheduled.
 - Drop Scheduled - This status is displayed with a Drop Scheduled badge
 when a child is currently enrolled, but has an upcoming Drop date scheduled.
 - Future Enrolled - This status is displayed with a Future Enrolled badge
 when a child is enrolled on a future date after today.
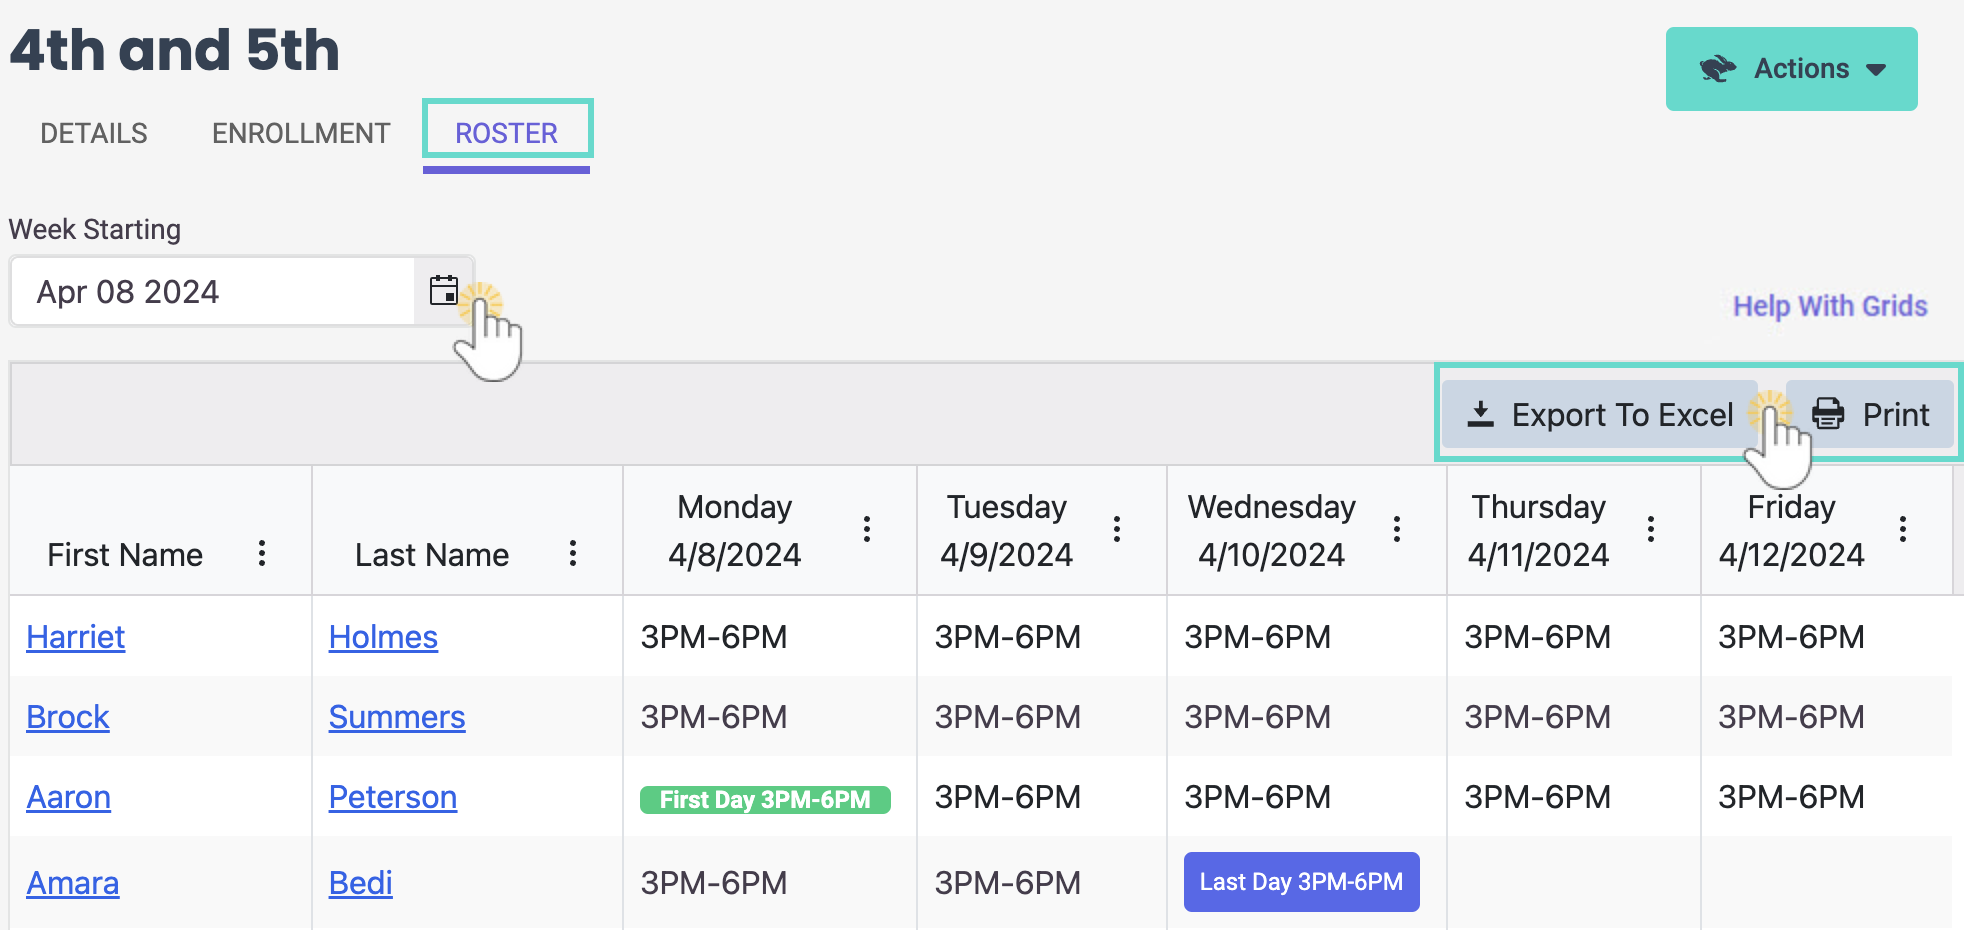
Class Roster Tab
Click the Roster tab on a class page to see a list of the children enrolled in the class. The date defaults to the current week, but can be changed from the Week Starting drop-down menu. From this page, you can export to Excel or print the roster for other uses as needed.
- Green badges indicate a child's first day of class and purple badges indicate a child's last day of class.
- Click the Actions menuto enroll additional children into the class.
- Children's names on this page are linked and open a child's Details page.
- Drag and drop columns in the grid.
- Use the Column menu icon
 to sort ascending/descending and add the child's Photo column to the grid.

Copy a Class
There is a simple 3-step workflow to copy a class. The workflow can be started from three different locations under the Programs & Classes menu.
- Go to Programs & Classes (left menu) > Programs & Schedules card > View All Classes.
- Select one of these options to start the Copy Class workflow:
From the Actions Menu
Click the Actions menu
> New Class from existing. Click the drop-down menu in the Select Class to Copy window and existing classes will be available to select from. Click Select Class to start the copy class workflow.From a Class Card
Click the Options icon
 on a class card for the class you want to copy and select Copy Class.
From a Class Page
Click on a class card to open the Class Page. From the Details, Enrollment, or Roster tab, go to the Actions menu
> Copy this Class.
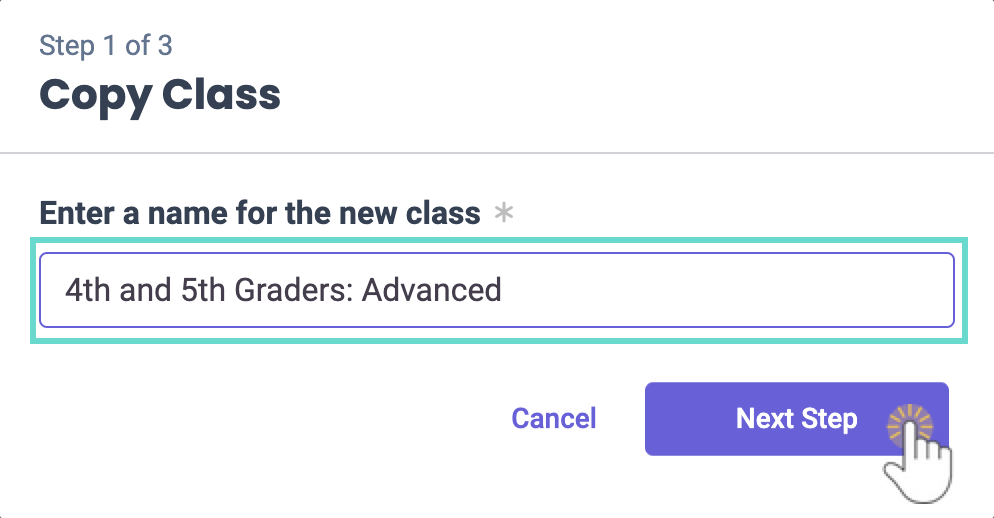
- Change the name of the class as needed in the Copy Class window. Click Next Step.
- Review the details of the class in the Copy Class window. Use the Edit icon to make changes to any information for the new class and click Next Step.

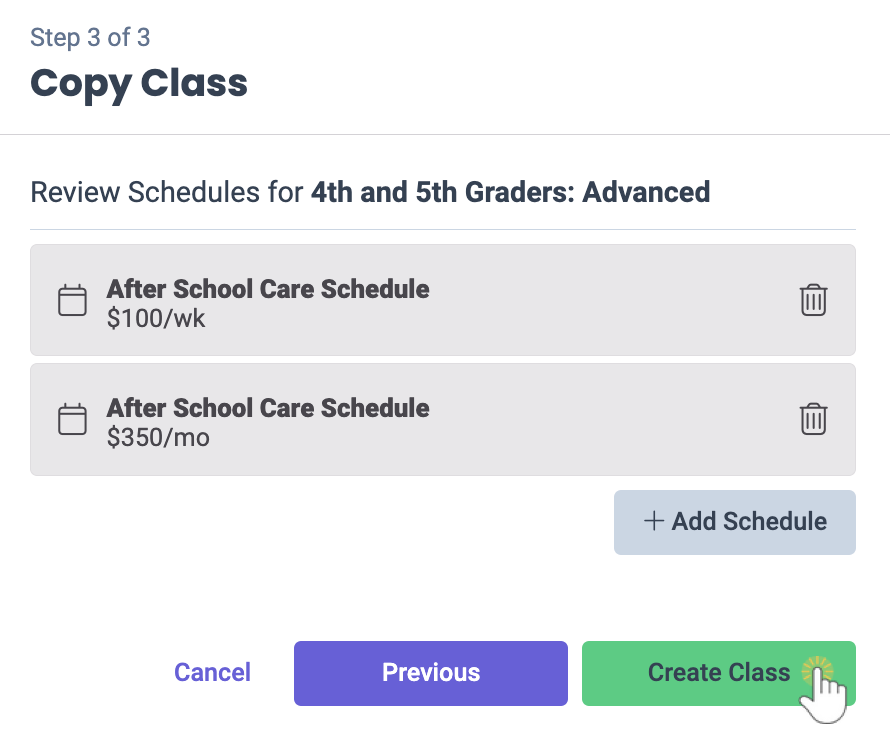
- Review the schedule including the tuition fees for the new class, and delete or add a new schedule as needed. Click Create Class when done.


The new class will open on a new page with the Details tab as the default view. Space, Ratio, and Teachers can be assigned immediately to the class.
Archive & Reinstate Classes
Classes are never really deleted, but they can be archived or put away when not needed and reinstated or set back to active. When classes are archived:
- Active enrollments will be dropped and the class won't be searchable and will not appear in any reports.
- Transactions and upcoming fees will not be updated and will need to be manually deleted from the Family Transactions.
|
Archive a Class |
Alternatively, a class can be archived from any tab on a Class page by going to the Actions menu |
|
Reinstate an Archived Class |
Alternatively, a class can also be reinstated by following the first three steps and then clicking the card for the archived class. Click the Actions menu |


Assign Teachers to Classes
After a teacher profile is created, they can be assigned to classes. It takes just a few clicks to assign a teacher to a class. The classes will immediately show up on the teacher's Dashboard when they sign in to the system.
Refer to Assign Teachers to Classes to learn how to assign and remove a teacher from a class.
FAQs
Q. How can I change the status of Inactive Class to Active and enroll students?
A. When the class end date has passed, it is automatically set to Inactive and displayed with an Inactive badge ![]() on the Classes page. To make the class active, go to the Details page for the class and change the class end date. Then, click the Actions menu> Enroll to enroll a student in the class.
on the Classes page. To make the class active, go to the Details page for the class and change the class end date. Then, click the Actions menu> Enroll to enroll a student in the class.
Q. Why doesn't my class appear on the Find and Create Openings page?
A. The Class End Date has passed or the class does not have a Schedule assigned. Review Work with Schedules for more information on adding a schedule to a class.
